Back

 AnyFX Shared Help -- Adobe Premiere Pro -- Native Interface

How to Use This Help System

This help guide includes basic info, tutorials, and tips. To access this help while using AnyFX Shared plugin, Click the More > Help or ? button.


Contents


How to Apply AnyFX Shared Plugin in Adobe Premiere
Basics Within AnyFX Shared
AnyFX Shared Saved Settings and Presets
Detailed AnyFX Shared Help and Tutorials
Pixelan custom interface

 How to Apply AnyFX Shared Plugin

AnyFX Shared Effects:

1. From the Effects window (Video Effects > Pixelan folder) of Premiere Pro, drag the AnyFX Shared Effects item on a clip.
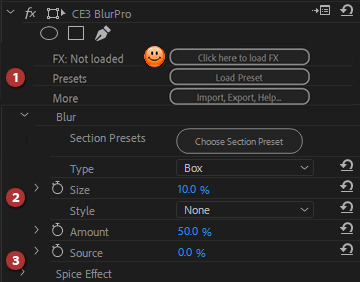
2. In the Effect Controls panel of Premiere Pro, click the Click here to load FX button to choose from a HUGE range of pre-made effects via a pop-up menu. See below for the basic steps to using AnyFX Shared.


AnyFX Shared Transitions:

1. From the Effects window (Video Transitions > Pixelan folder) of Premiere Pro, drag the AnyFX Shared Transitions item onto a cut point between two clips in any track.
2. Click the applied transition in the Premiere timeline to activate it. Drag the transition's edge to adjust its duration as desired.
3. In the Effect Controls panel of Premiere Pro, click the Click here to load FX button to choose from a HUGE range of pre-made transitions via a pop-up menu. See below for the basic steps to using AnyFX Shared.

 Basics Within AnyFX Shared

AnyFX Shared Easy Steps

AnyFX Shared Native Interface

Click here to choose from a HUGE range of pre-made effects via a pop-up menu. Click More to quickly load a recently used preset.
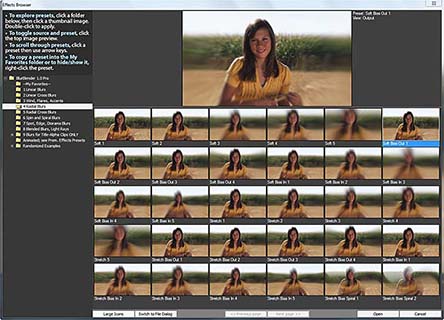
(1) Check if the effect has presets. Most effects (except the simplest ones) come with a set of ready-to-use presets. Click the Load Preset button to visually choose from the available pre-made effects (plus saved favorites) in an animated Effects Browser window.
To create a new effect or to modify a preset...
(2) Adjust the controls in the main effect sections. For detailed help per control, click the More > Fx Help button. Since virtually all AnyFX Shared controls are keyframable, you can smoothly vary individual aspects of the effect during a clip, leading to terrific evolving imagery.
(3) If needed, untwirl other sections of the effect to fine-tune further.

AnyFX Shared tutorial for Adobe Premiere
Handy Tip for ALL Premiere Pro & Elements users:
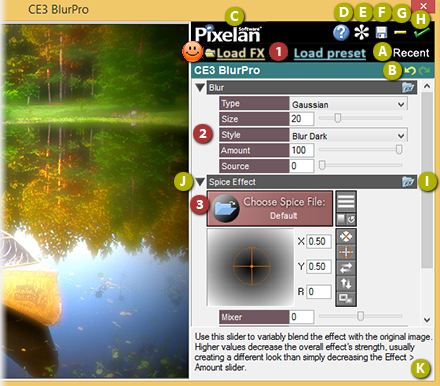
Click the More > Open Pixelan UI button to access a Pixelan custom interface (as shown below). Premiere's built-in controls offer native keyframing and are most convenient to fine-tune an effect. But our custom interface shows detailed help per control -- an advantage when first using our plugins.

 Effect Presets

AnyFX Shared Saved Settings and Presets

Most AnyFX Shared plugins has two or three types of presets -- Effects Browser presets, Section presets and Spice Library presets (in some plugins only). Premiere Pro additionally can create Animation presets in its Effects Control panel.


Effects Browser presets

Effects Browser

This is the most powerful and visual way to access presets and is where HUNDREDS of presets are located. Click the Load Preset button at the top of AnyFX Shared to open a wonderful large Effects Browser window to visually choose/compare from many pre-made presets (including those you have made and saved for future re-use) To save your own custom presets in the Effects Browser, use effect controls to set up the desired look, then click the Save button in the main effect control area.


Time-saving tips to load presets faster:
The Effects Browser is fast, but sometimes you may already know which preset you want to use, such as when you are applying the same preset repeatedly in a project. In that situation, selecting a preset by one of the following methods can be faster...

To see recently chosen Effects Browser presets, click the Recent button. For a drop-down menu of Effects Browser presets, click the Menu button. To use a standard Open file dialog box, click the Open button.

Effects Browser


Spice Library presets

Spice Library

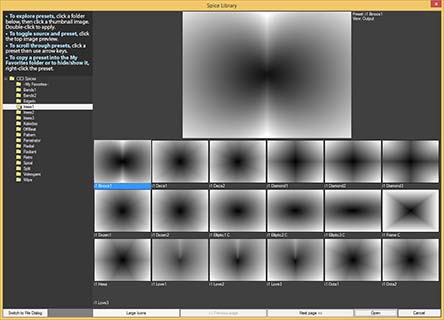
Each 'spice' is a specially-designed grayscale map that guides the effect. It's simple in concept but incredibly flexible and organic in its creative possibilities compared to the usual hard-edged, limited-adjustment, standard algorithmic effects.
Click the large
Choose Spice File button located in Spice section (if present) to open a Spice Library window and visually choose/compare from 600+ spices.
Click a subfolder in the Library's left pane,
as shown below. Thumbnail-size previews of available effects will then play in the right pane so you can visually compare and choose the best effect design for your segment.
Double-click a thumbnail in the Library's right pane to select the effect and close the Library.
To choose a spice but bypass the Library, Alt-click the
Choose Spice File button to get a standard Open dialog box. Then navigate to and select the file. This is how you can load an image you have created.
Shift
-click the
Choose Spice button to quickly load a spice via a multi-level menu. Ctrl-click the Choose Spice button to quickly load a recently used spice.
Spice Library Browser


Handy tips while working within the Effects Browser and Spice Library:
• To scroll through presets in a folder while keeping your eye on the top preview image for comparison, hold the mouse pointer over the right panel then use arrow keys or the mouse wheel.
• To increase/decrease the thumbnail image size, use the Size button at the bottom of the Effects Browser.
• To copy a favorite preset into the My Favorites folder located atop the left column of preset folders, right-click any preset image and choose Copy to My Favorites. To copy the preset into a subfolder within that folder (such as if you want to organize presets per project or per client), right-click the preset and choose Copy to My Favorites >> [new subfolder]. You can then name the subfolder as desired. After the subfolder is created, it will also appear in the right-click menu.
• To rename a preset that is in the My Favorites folder, right-click the preset there and choose Rename this preset. To remove a My Favorites preset, right-click and choose Delete this preset.
• To hide any preset, right-click the preset and choose Hide this preset. To show all hidden presets in a folder, right-click any preset in that folder and choose Restore all hidden presets from this folder. To temporarily view the folder's hidden presets, which can be handy if you just want to momentarily browse them, choose Temporarily show hidden presets.
• To toggle between viewing the source file image and the AnyFX Shared preset, click the top large preview image in the Effects Browser.

Section presets

Unlike the most Effect Browser presets, these change ONLY some or all controls in ONE section. Mixing presets from several sections is a quick and easy way to try hundreds of fresh effect variations. Click the Section Presets button at the top of any control section to instantly change ONLY the controls in that section via handy presets we have developed. Use this to quickly and easily make hundreds of new effect variations.

Premiere Pro Animation Presets

In Premiere Pro, to create an Animation Preset, right-click our plugin's name, then choose Save Preset... Then you can drag-and-drop it conveniently from the Presets section of the Effect Controls panel. Cool!

 Detailed AnyFX Shared Help and Tutorials

 Pixelan custom interface

AnyFX Shared Easy Steps

Basics Within AnyFX Shared

AnyFX Shared tutorial for Adobe Premiere
Click here to choose from a HUGE range of pre-made effects via a pop-up menu. Click Recent to quickly load a recently used preset.
(1) Check if the effect has presets. Most effects (except the simplest ones) come with a set of ready-to-use presets. Click the Load Preset button to visually choose from the available pre-made effects (plus saved favorites) in an animated Effects Browser window.
To create a new effect or to modify a preset...
(2) Adjust the controls in the main effect sections. For detailed help per control, Alt-click the ? button.
(3) If needed, untwirl other sections of the effect to fine-tune further.
(A) Load a Recent Effect. Click “Recent” to instantly access a submenu of your recently applied effects, saving time.
(B) Undo/Redo. Click the green arrows to undo or redo your prior steps – great for experimenting with new looks/variations.
(C) Effect Info. Click the Pixelan logo to access this info.
(D) Help. Click the blue ? button to access AnyFX Shared help.
(E) Preferences. Click the asterik to adjust preferences.
(F) Save an Effect. Click the disk to save a favorite effect as a preset you can re-load instantly.
(G) Clear Settings. Click the minus sign to clear current settings.
(H) Apply. Click the green check mark to apply the effect & close the window. To exit without changes, click the X in the top right corner.
(I) Section Presets. Click an FX folder icon to instantly change only the controls in that section via handy presets we have developed. Section Presets will instantly configure controls IN THAT SECTION into a powerful combination.
(J) Expand/Collapse Sections. To expand or collapse a section, use the “twirly” at the left of a control section.
(K) Context-Sensitive Help/Tips. Hover your cursor over any control or area to see extensive context-sensitive help and tips.


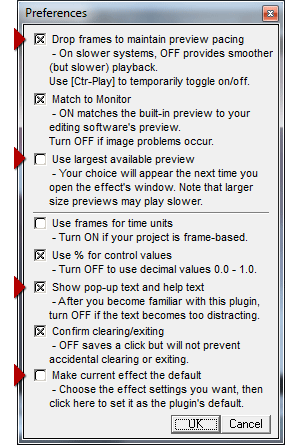
AnyFX Shared preferences

Preferences Settings -- In the Pixelan Custom Interface ONLY


In the Preferences settings, you can customize AnyFX Shared significantly to your video editing system's power and your working style. At right are the default Preferences Settings. Four Preferences options in particular may be handy for you to change (all shown with an adjacent red triangle). If you have very fast video editing hardware, consider turning off "Drop frames to maintain preview pacing." If you also have a high-resolution monitor and are editing with HD or larger footage, consider turning ON "Use largest available preview" which will use the largest preview size in AnyFX Shared that can fit in your monitor while still leaving sufficient room for effects controls. Note that your choice for this setting will appear the next time you open effects window.

After you become more familiar with AnyFX Shared, consider turning off "Show pop-up text and help text." That will leave more vertical space for the section controls and also reduce any distraction from the ever-changing help text. Last but not least, you can easily set a new default effect. Set up the effect control's as desired, then go into the Preferences dialog and choose "Make current effect the default."


Copyright © 2025 by Transmutators EOOD. All rights reserved. Pixelan is a trademark of Transmutators EOOD. All other products mentioned are for identification purposes only and may be trademarks or registered trademarks of their respective owners.