AnyFX Shared Saved Settings and Presets
Most AnyFX Shared plugins has two or three types of presets -- Effects Browser presets, Section presets and Spice Library presets (in some plugins only).
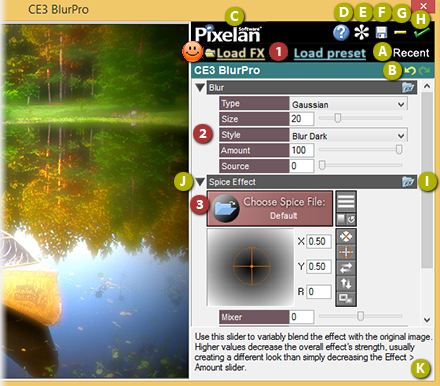
Effects Browser presets
This is the most powerful and visual way to access presets and is where HUNDREDS of presets are located. Click the Load Preset button at the top of AnyFX Shared to open a wonderful large Effects Browser window to visually choose/compare from many pre-made presets (including those you have made and saved for future re-use) To save your own custom presets in the Effects Browser, use effect controls to set up the desired look, then click the Save button in the main effect control area.
Time-saving tips to load presets faster:
The Effects Browser is fast, but sometimes you may already know which preset you want to use, such as when you are applying the same preset repeatedly in a project. In that situation, selecting a preset by one of the following methods can be faster...
To see recently chosen Effects Browser presets, click the Recent button. For a drop-down menu of Effects Browser presets, right-click the Load Preset button. To use a standard Open file dialog box, Alt-click the Load Preset button. |
Effects Browser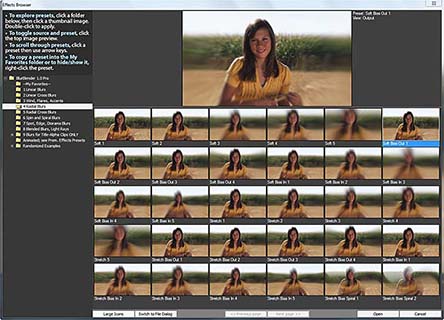
|
Spice Library presets
Each 'spice' is a specially-designed grayscale map that guides the effect. It's simple in concept but incredibly flexible and organic in its creative possibilities compared to the usual hard-edged, limited-adjustment, standard algorithmic effects.
Click the large Choose Spice File button located in Spice section (if present) to open a Spice Library window and visually choose/compare from 600+ spices.
Click a subfolder in the Library's left pane, as shown below. Thumbnail-size
previews of available effects will then play in the right pane so
you can visually compare and choose the best effect design for your segment.
Double-click a thumbnail in the Library's right pane to select the effect
and close the Library.
To choose a spice but bypass the Library, Alt-click
the Choose Spice File button to get a
standard Open dialog box. Then navigate to and select
the file. This is how you can load an image
you have created.
Shift-click
the Choose Spice button to quickly load a spice via a multi-level menu. Ctrl-click
the Choose Spice button to quickly load a recently used spice. |
Spice Library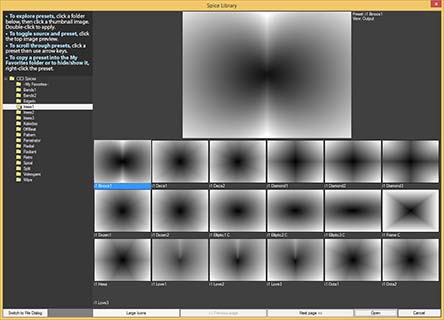
|
Handy tips while working within the Effects Browser and Spice Library:
• To scroll through presets in a folder while keeping your eye on the top preview image for comparison, hold the mouse pointer over the right panel then use arrow keys or the mouse wheel.
• To increase/decrease the thumbnail image size, use the Size button at the bottom of the Effects Browser.
• To copy a favorite preset into the My Favorites folder located atop the left column of preset folders, right-click any preset image and choose Copy to My Favorites. To copy the preset into a subfolder within that folder (such as if you want to organize presets per project or per client), right-click the preset and choose Copy to My Favorites >> [new subfolder]. You can then name the subfolder as desired. After the subfolder is created, it will also appear in the right-click menu.
• To rename a preset that is in the My Favorites folder, right-click the preset there and choose Rename this preset. To remove a My Favorites preset, right-click and choose Delete this preset.
• To hide any preset, right-click the preset and choose Hide this preset. To show all hidden presets in a folder, right-click any preset in that folder and choose Restore all hidden presets from this folder. To temporarily view the folder's hidden presets, which can be handy if you just want to momentarily browse them, choose Temporarily show hidden presets.
• To toggle between viewing the source file image and the AnyFX Shared preset, click the top large preview image in the Effects Browser.
Section presets
Unlike the most Effect Browser presets, these change ONLY some or all controls in ONE section. Mixing presets from several sections is a quick and easy way to try hundreds of fresh effect variations. Click the Section Presets button at the top of any control section to instantly change ONLY the controls in that section via handy presets we have developed. Use this to quickly and easily make hundreds of new effect variations. |