AnyFX Shared Easy Steps 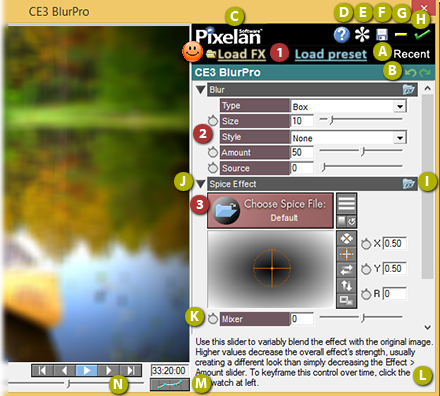
 Click here to choose from a HUGE range of pre-made effects via a pop-up menu. Click Recent to quickly load a recently used preset. Click here to choose from a HUGE range of pre-made effects via a pop-up menu. Click Recent to quickly load a recently used preset.
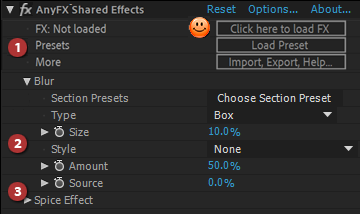
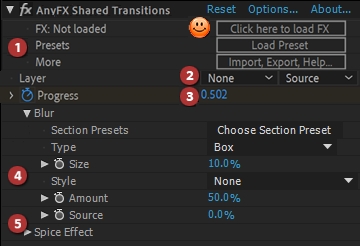
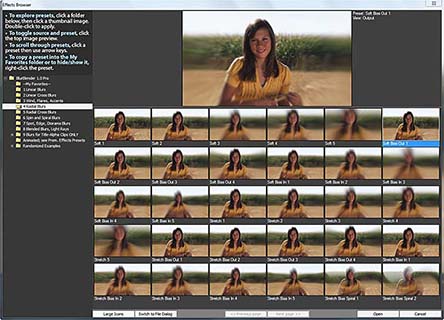
(1) Check if the effect has presets. Most effects (except the simplest ones) come with a set of ready-to-use presets. Click the Load Preset button to visually choose from the available pre-made effects (plus saved favorites) in an animated Effects Browser window.
To create a new effect or to modify a preset...
(2) Adjust the controls in the main effect sections. For detailed help per control, Alt-click the ? button. Since virtually all
AnyFX Shared controls are keyframable, you can smoothly vary individual aspects
of the effect during a clip, leading
to terrific evolving imagery.
(3) If needed, untwirl other sections of the effect to fine-tune further. |
Basics Within AnyFX Shared
(A) Load a Recent Effect. Click “Recent” to instantly access a submenu of your recently applied effects, saving time.
(B) Undo/Redo. Click the green arrows to undo or redo your prior steps – great for experimenting with new looks/variations.
(C) Effect Info. Click the Pixelan logo to access this info.
(D) Help. Click the blue ? button to access AnyFX Shared help.
(E) Preferences. Click the asterik to adjust preferences for preview playback size and speed, time units, help text visibility, setting the default AnyFX Shared effect, etc.
(F) Save an Effect. Click the disk to save a favorite effect as a preset you can re-load instantly.
(G) Clear Settings. Click the minus sign to clear current settings.
(H) Apply. Click the green check mark to apply the effect & close the window. To exit without changes, click the X in the top right corner.
(I) Section Presets. Click an FX folder icon to instantly change only the controls in that section via handy presets we have developed. Section Presets will instantly configure controls IN THAT SECTION into a powerful combination.
(J) Expand/Collapse Sections. To expand or collapse a section, use the “twirly” at the left of a control section.
(K) Keyframing. Click the stopwatch icon to vary the control over time. A separate Keyframes window will open (see additional Keyframing help below.) Right-click a stopwatch to clear keyframing.
(L) Context-Sensitive Help/Tips. Hover your cursor over any control or area to see extensive context-sensitive help and tips.
(M) Keyframes Window. Click to open/ close the Keyframes window. See below on this page for tutorial help about the Keyframes window.
(N) Preview Controls. Use these standard playback buttons to preview your effect. |
Keyframing in AnyFX Shared
To VARY a control over time, use AnyFX Shared's powerful but easy-to-use keyframing. Follow the simple process below.
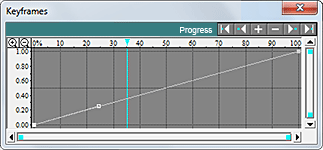
1. Go to the frame where you want a control's value to BEGIN to vary over time during the effect. There are several ways to do this: use AnyFX Shared's built-in Preview Controls, or enter a frame time in the Current Time/Frame box. Or click the stopwatch icon next to the control to open the Keyframes Window, then drag the blue vertical frame marker left or right.
The Keyframes Window graph vertically shows the control's value plotted over time (horizontally, from 0% to 100% of the effect's duration). In this example, the Progress is linear from 0% to 100%. |
 |
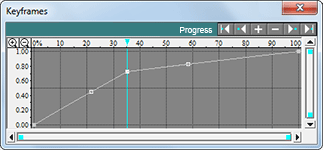
2. Adjust the control's value in the main AnyFX Shared window. In the graph, if a keyframe already exists at the current frame, the adjustment will raise or lower that keyframe. If a keyframe doesn't exist, the adjustment will insert a new keyframe in the graph, as shown at right.
Changing the control's value adds a new keyframe, if not already present. TIPS: To hold/freeze the effect's progress, horizontally flatten all or part of the line. To experiment and revert if needed to earlier keyframing, use the Undo/Redo buttons in the main AnyFX Shared window.
|
 |
HANDY TIPS: Another way to add a new keyframe is to click ON an empty segment of the keyframe LINE, then drag that new keyframe wherever desired. As you drag, coordinates will appear and the preview will update. To move a keyframe only horizontally or vertically in the graph, Shift-drag it. To fine-tune the position, click the Zoom (+) button in the graph's top-left corner to zoom in, then drag as needed. (Repeat to zoom further.) To precisely position a keyframe, right-click it in the graph and choose Enter coordinates. |
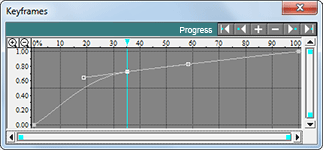
3. Use a bezier curve to accelerate or decelerate the control's value over time. Straight keyframe line segments as shown above represent a linear (constant) rate of change in an effect's value. To smoothly accelerate or decelerate it, which can provide a more professional/realistic look, curve the keyframe line by dragging a bezier curve handle.
Attached to any active keyframe are two bezier curve handles (one handle if a start or end keyframe). If the handle(s) are not visible, click the keyframe (or move the blue vertical frame marker near it). To decelerate, create an downward curve (shown). To accelerate, create an upward curve. |
 |
To delete a keyframe, right-click it in the graph and choose Delete keyframe. Or click the Delete Key (-) button above the Keyframes window. To delete ALL keyframes for a control, right-click the control's stopwatch icon. To delete ALL keyframes for a control AND revert to the control's default value, right-click in the graph's gray background and choose Revert to default. |
More Keyframing Tips
 • To hide/show the Keyframes Window, click the Keyframes Window button ("M") below the preview's bottom right corner. Note that each keyframable control has its own keyframes graph. To see the keyframes graph for a particular control, click the stopwatch icon at the left of that control. Or click in the turquoise color bar that is above the keyframes graph. • To hide/show the Keyframes Window, click the Keyframes Window button ("M") below the preview's bottom right corner. Note that each keyframable control has its own keyframes graph. To see the keyframes graph for a particular control, click the stopwatch icon at the left of that control. Or click in the turquoise color bar that is above the keyframes graph.
 • To jump to a keyframe, click it in the keyframes graph. But among tightly clustered keyframes, sometimes that can be difficult. Or you may want to activate a keyframe without accidentally changing its position. The solution is to use the button bar above the top right corner of the graph. For example, to activate the next or previous keyframe, click the Next Key or Prior Key button. • To jump to a keyframe, click it in the keyframes graph. But among tightly clustered keyframes, sometimes that can be difficult. Or you may want to activate a keyframe without accidentally changing its position. The solution is to use the button bar above the top right corner of the graph. For example, to activate the next or previous keyframe, click the Next Key or Prior Key button.
• To copy and paste an ENTIRE keyframe line into another control, right-click the Keyframes graph background and choose Copy or Paste. Note that if copied values do not fit within the parameters of the paste location, they will be modified. To match ONE keyframe's value to another keyframe, right-click the keyframe that has the desired value, then choose Copy value. Then right-click the other keyframe and choose Paste value.
• To adjust an ENTIRE complex keyframe line you've created, right-click the graph's background and choose an option to invert or flip the keyframe line, or Scale/Move to scale its peaks larger/smaller or shift its timing ahead/back -- a great timesaver over manual adjustment.
• To customize the Keyframes graph display, right-click the Keyframes graph background to access four Appearance options, such as to show/hide the graph's grid lines or scroll bars. Any change will be remembered. Save window position opens the Keyframes window at a consistent screen location. Attach to main window keeps the Keyframes window attached if you move the main window.
• To move a bezier handle that is on top of a keyframe,click to activate the keyframe that "owns" that handle. Then Ctrl-drag the bezier handle where desired.
• To stay at a frame while adjusting keyframes elsewhere, right-click the graph's gray background and deselect Sync preview. This can be handy, for example, to adjust a bezier curve while seeing how it alters an earlier or later frame's look.
• To snap a keyframe to the vertical playback marker position (when Sync preview is off; see above), position the vertical playback marker where desired, then right-click the keyframe you want to move and choose Snap to Time. If the marker's position is not possible because it is beyond an adjacent keyframe, the command will not be available.
• To make automatic bezier curve adjustments (instead of dragging a handle), right-click the keyframe and choose Convert keyframe to. Then choose an option shown below. To modify ALL keyframes in a graph, right-click the graph's background and choose Convert all keyframes to.
Linear -- remove all curves in the keyframe
Smooth -- decelerate before & accelerate after
Bounce -- accelerate before & decelerate after (opposite of smooth)
|
Smooth In -- decelerate before
Smooth Out -- accelerate after
Bounce In -- accelerate before
Bounce Out -- decelerate after |
• To zoom in, Alt-drag in the graph where you want to zoom. To zoom in vertically to the range where keyframes exist, right-click the graph's gray background, then choose Fit graph to keyframes. This can help you to fine-tune values in relatively flat keyframe lines. Other ways to zoom in vertically are: drag inward the vertical scroll bar, or Shift-click the Zoom In (+) button. Shift-click the Zoom Out (-) button to vertically zoom out. To bring the blue vertical playback marker into the zoomed region, click in the numerical scale above the graph.
 Preferences Settings -- In the Pixelan Custom Interface ONLY
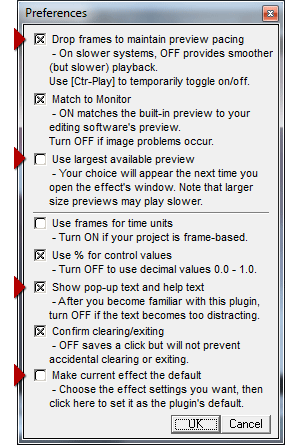
In the Preferences settings, you can customize AnyFX Shared significantly to your video editing system's power and
your working style. At right are the default Preferences Settings. Four Preferences options in particular may be handy for you to change (all shown with an adjacent red triangle). If you have very fast video editing hardware, consider turning off "Drop frames to maintain preview pacing." If you also have a high-resolution monitor and are editing with HD or larger footage, consider turning ON "Use largest available preview" which will use the largest preview size in AnyFX Shared that can fit in your monitor while still leaving sufficient room for effects controls. Note that your choice for this setting will appear the next time you open effects window.
After you become more familiar with AnyFX Shared, consider turning off "Show pop-up text and help text." That will leave more vertical space for the section controls and also reduce any distraction from the ever-changing help text. Last but not least, you can easily set a new default effect. Set up the effect control's as desired, then go into the Preferences dialog and choose "Make current effect the default."
|